


| |

|
|
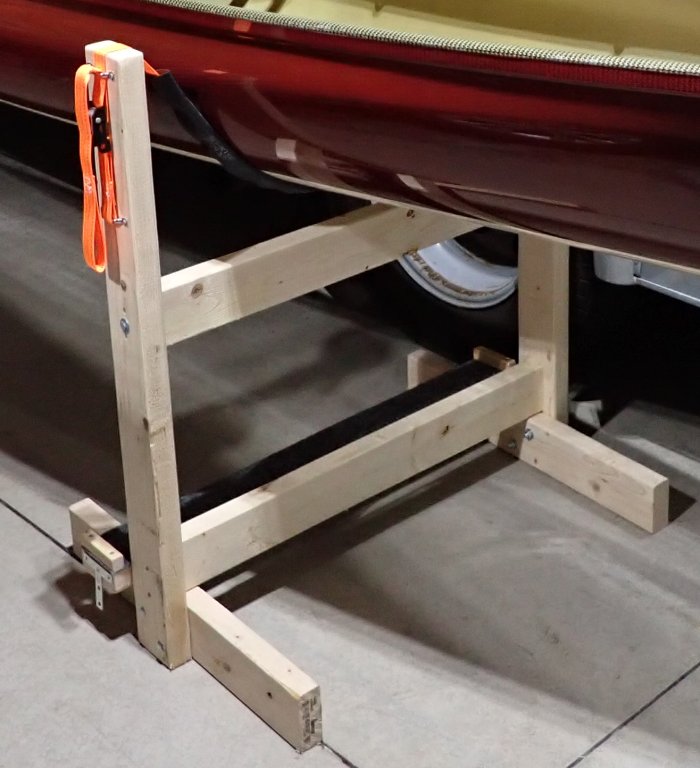
Build Your Own Adjustable Canoe Workstands
Plans for building a sturdy home workstand for your Canoe (or kayak).
|
You will need five eight foot two by fours for building two stands and cut them to the following lengths (Figure 1):
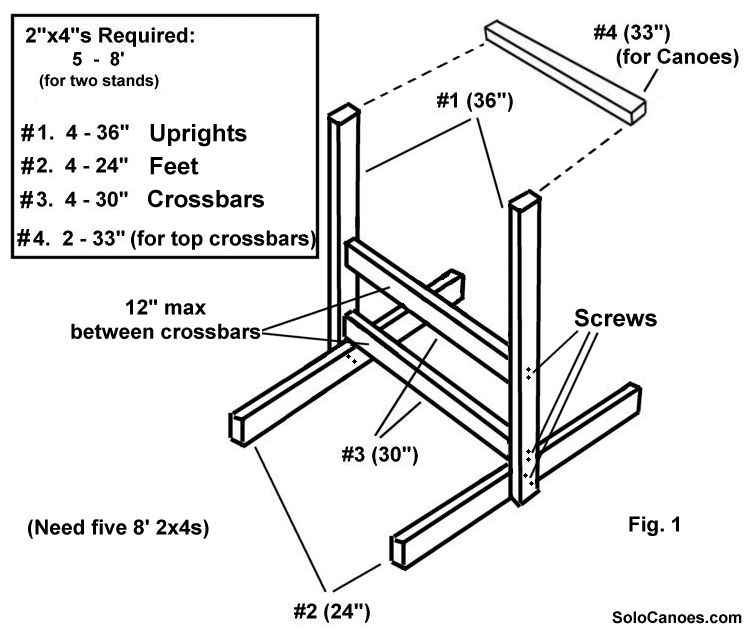
I used 32 - 3" deck screws to assemble both the stands after cutting the lengths needed.
Building the first stand:
Attach two 36" uprights (#1) to center of two of the 24" feet (#2). (I used two 3" screws on each side here).
Attach lower 30" crossbar (#3) to two of the feet with uprights attached. Edge up makes it a little sturdier.
Set crossbar edge up right on top of feet and fasten to uprights at each end using use two 3" screws from outside of uprights on each side.
Attach second 30" crossbar (#3) edge up between the two uprights (#1) making sure there is no more than 12" distance between the crossbars.
You can use a couple of 10" to 12" lengths (cut the same length) of spare wood as temporary spacers between the crossbars to keep them the same distance from eachother until the screws are in place.
Do not attach the 33" removable crossbar (#4).
Repeat above for second stand. When done just give a quick sanding to all the sharp edges on the top of the uprights.
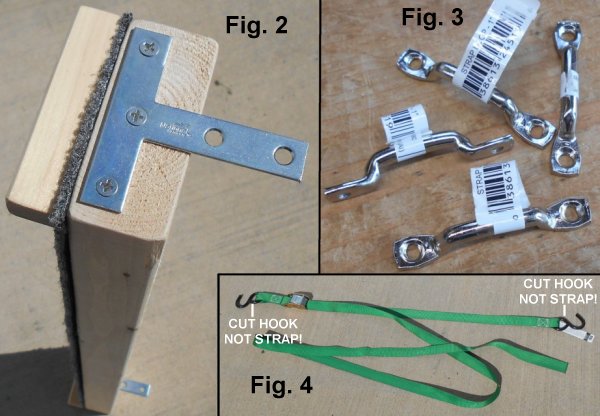
Attaching the adjustable straps - What you'll need:
Eight 1" strap loops (Fig. 3) I got mine at Tractor Supply.
Sixteen 1" deck screws (for mounting strap loops)
Two 1" adjustable cargo straps with loops with hooks at each end. (Fig. 4) (six feet long or longer).
First, cut the hooks off the cargo straps (Fig. 4). DO NOT cut the nylon loops the hooks go through. You need those. Cut the actual metal hooks off.
It's a pain as they are hardened steel but you will need the nylon loops for attaching to the strap loops (Fig. 3).
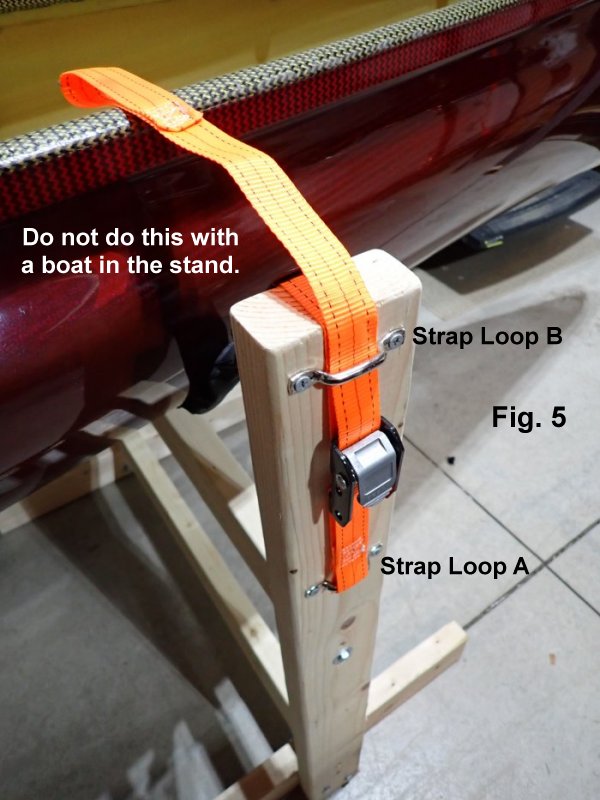
Put Strap Loop A (Fig. 5) through loop in cargo strap (Fig. 4) and screw strap loop A to outside of upright with buckle facing up leaving enough distance so buckle is 4"-5" below top of upright. (See Fig. 5 A)
Mount second Strap Loop no more than 1 inch down from top of upright (See Fig. 5 B). Feed other side of cargo strap through strap loop B from top and down through buckle then back up through Strap Loop B (See Fig. 5 B).
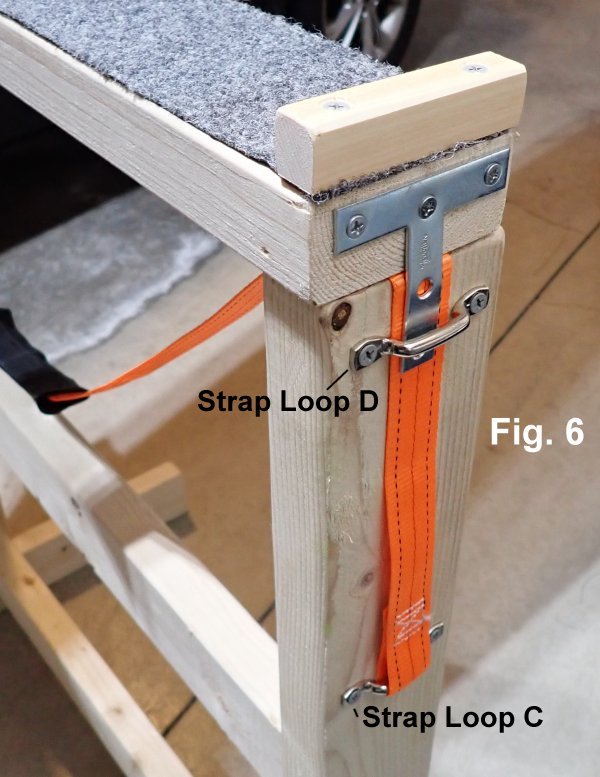
Go to opposite upright and put Strap Loop C through loop in other end of cargo strap.
Mount Strap Loop C on outside of upright at same height as you did on opposite side with Strap Loop A. Mount Strap loop D over cargo strap within an inch of the top as you did on the opposite side with Strap Loop B.
You can now go back to other side and adjust cargo strap to any length you need to cradle hull without touching top crossbar. If there is a lot of excess strap you can cut the excess and melt the end of the strap to keep it from fraying.
I slid a section of bicycle tube over each of my straps to give them just a little more cushion. Some also use pool noodles or closed foam pipe insulation. Just remember to keep the straps or whatever you use clean.
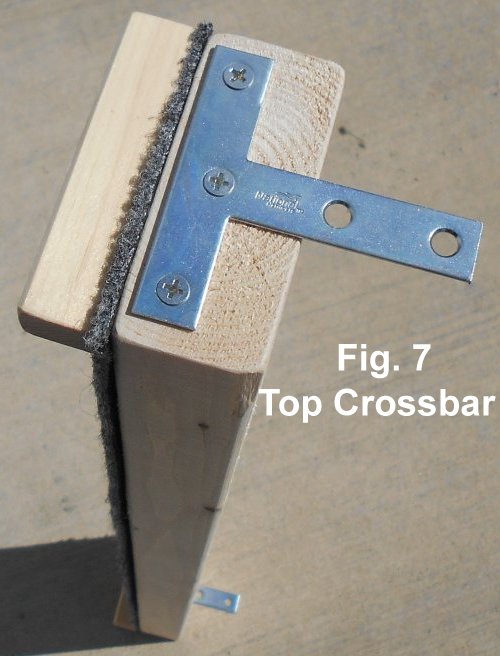
Two Removable Top Crossbars - What you will need:
Four 3" T brackets,
16 1¼" counter sunk deck screws,
some outdoor carpet,
and four small blocks of wood,
and the four 33" 2x4s (#4).
These should be pretty easy. Screw a T bracket on each end of 33" 2x4 with tabs facing same way. (see Fig. 7). Set crossbars on top of uprights with the bottom of the T brackets sticking through top strap loops (no need to remove straps). The strap loops will help hold the top crossbars in place.
Cut and staple outdoor carpet to top surface where the canoe will sit to protect gunwales. Screw a narrow
block of wood (use countersunk screws to protect the boat) to each end of top removable crossbar (see Fig. 7) to help prevent boat from sliding off when you're working on it.
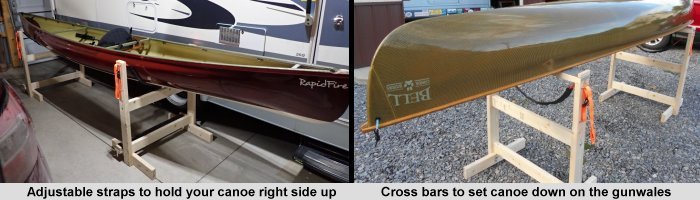
Your done! You can now use your new work stands to securely hold your boat in either position.
For more stability move the work stands closer together so there's only an inch or two between the uprights and the hull.

Shortcut for kayaks that don't need top crossbars:
Instead of cargo straps and strap loops, drill a hole through the top of one upright about a inch from the top and a make a narrow vertical slot an inch deep just wide enough for a rope in the top of the opposite upright.
Put a knot in the end of a rope and feed it through the hole to the other side. You can then tie knots a couple inches apart in the rope on the other side and drop the rope through the slot.
The knots will keep the rope in place and be your adjustment.
You can change the length just by pulling the rope out of the slot and using the different knots. Not as pretty or as easy on the hull but cheaper and still gives you some adjustment.
Hope you found these plans useful,
Steve Johnson
|
|
